Learn To Love AI, Evolve Your DBA Career, And…
May 17, 2018
1,200 sessions, 5 days and countless insights on technology; here’s a sum up of Collaborate 18 covering everything from AI and data security to cloud, autonomous and more: #dbsat
Learn To Love AI, Evolve Your DBA Career, And…
At the Collaborate 18 conference in Las Vegas, members of three of the world’s largest independently run user groups for Oracle apps, tech, and cloud services met to plot their collective futures. Read an overview of the hottest topics of conversation.
Creating a Secure Connection Between Oracle…
May 16, 2018
This blog post explains how to create a secure and encrypted IPSec site-to-site tunnel between Oracle Cloud Infrastructure and another third-party cloud provider. Read more:
Creating a Secure Connection Between Oracle…
In today’s world, having a secure, encrypted, point-to-point channel through which your data can travel from a specific location to the cloud contributes to a safer solution if you want to avoid breaches and data loss.
How Oracle’s New Autonomous Data Warehouse Works
April 3, 2018
Oracle Autonomous Data Warehouse Cloud Service is the new standard for simplicity. Discover why:
How Oracle’s New Autonomous Data Warehouse Works
Oracle Autonomous Data Warehouse Cloud lets organizations set up a high-powered data warehouse in less than a minute.
Recovering From Disaster
March 28, 2018
What if the worst happens and all of your data security processes fail? Building a drama-free disaster recovery capability is key. Discover how:
Recovering From Disaster
Learn how to ease the data security process. Your business depends on it. Discover how:
Post Oracle acquisition, NetSuite is all about…
March 27, 2018
The new story that NetSuite wants to talk about is focused more on the customer. And they still have a lot to say. Here’s how the company continues to grow after being acquired by Oracle:
Post Oracle acquisition, NetSuite is all about…
Before being acquired by Oracle in 2016, NetSuite — along with Salesforce — emerged as one of the star players of the cloud-based SaaS world. Now Netsuite is leveraging Oracle’s global scale and resources to accelerate its international growth.
Applying patches on WebLogic Server using Oracle Smart Update(BSU)
December 29, 2010
Oracle provides the Smart Update utility to apply patches and upgrade the WebLogic Server installations. Oracle’s Weblogic Server is now a critical component of Fusion Middleware and every other component of Fusion Middleware requires Weblogic Server to be installed as a pre-requisite. Applying patches and upgrading Weblogic Server is quite straight forward using the Oracle’s Smart Update utility,the documentation for Oracle Smart Update Utility can be found here
1. Shutdown and take a complete backup of the WLS environment.
The Startup/Shutdown scripts are placed in $WLS_HOME/user_projects/domains/<domain_name>/bin
2. The Oracle Smart Update Tool is located at “$WLS_HOME/utils/bsu”
3. Launch the the Oracle Smart Update Tool :
4. Once logged in, you will be presented with Oracle Smart Update Dialog.
5. You can choose to “Register for security updates”, this is usually helpful to keep yourself updated with the latest security updates and product expiration.

6. Click the “Get Patches” tab to see the latest patches available.
7. On the left pane you would see Weblogic Servers installed and on the right pane you will see two tabs. “Get Patches” and “Manage Patches” and a section to show the downloaded patches.
8. Now select the patches and hit the “Download Selected” button, you will be prompted if you wish to to validate and resolve conflicts.
9. The Validation completes with the following message:
 10. Click “OK” to proceed downloading the patches.
11. Once the patches are downloaded and click the “Manage Patches” tab to proceed with the patch application. In the “Downloaded Patches” section you will notice the patches downloaded, click the “up” arrow to apply the patch
12. You will be prompted with couple of prompts for you to take action:
13. Once more the validation is done, click “OK” to proceed
14. One more “Are you sure?” prompt, annoying I know :). Click “Proceed” to apply the patch
 15. Once the patch is applied you’d see the patch in the Applied Patches “Default” tab
Thats it the patch is now applied. If you face any issues its worth investigating the server logs.
Convert 11gR2 non-RAC database to RAC database using rconfig
August 4, 2010
This post talks about the Conversion of 11gR2 non-RAC database to RAC database using rconfig.
Oracle provides 3 methods to convert non-RAC single instance database to RAC databases:
1. DBCA
2. rconfig
3. Enterprise Manager
All the 3 have their own benefits and can be used to suit one’s needs. My recent work involved the conversion of non-RAC single instance database to RAC database using rconfig, although I’ve tested all the 3 methods but concluded on rconfig.
Pre-requisites:
1. Configure Shared Storage setup ASM, NFS (NAS) or clustered storage.
- For ASM, refer to Oracle Database Storage Administrator’s Guide11g Release 2 (11.2)
- For configuring shared storage, refer to Configuring Storage for Grid Infrastructure for a Cluster and Oracle Real Application Clusters (Oracle RAC) (Linux)
- See also Oracle Database Administrator’s Guide 11g Release 2 (11.2)
2. A clustered Grid Infrastructure install with at least one Scan listener address. See
Oracle Grid Infrastructure Installation Guide 11g Release 2 (11.2) Linux
3. rconfig imposes a restriction on the choice of listener. The listener must be the default listener, and it must run from the Grid Infrastructure home.
srvctl add listener -p 1522
After conversion, you can reconfigure the listener as required.
4. Install Clustered Oracle Database Software as per documentation, this can be done by choosing the right configuration option. Refer to :
http://download.oracle.com/docs/cd/E11882_01/install.112/e10813/racinstl.htm#BABJGBHB
I’ve installed the new 11gR2 clustered ORACLE_HOME at
/u01/app/oracle/product/11.2.0/db_2
on both the nodes orarac01 and orarac02
Converting Single Instance Database using rconfig
1. As an “oracle” OS user navigate to
$ORACLE_HOME/assistants/rconfig/sampleXMLs
2. Open the sample file ConvertToRAC_AdminManaged.xml using a text editor such as vi. This XML sample file contains comment lines that provide instructions on how to edit the file to suit your site’s specific needs.
3. Ensure you edit the xml with convert verify="ONLY"The following are the sample entries:
<!--Specify current OracleHome of non-rac database for SourceDBHome -->
 /u01/app/oracle/product/11.2.0/db_1
<!--Specify OracleHome where the rac database should be configured. It can be same as SourceDBHome -->
 /u01/app/oracle/product/11.2.0/db_2
<!--Specify SID of non-rac database and credential. User with sysdba role is required to perform conversion -->

...

<!--Specify the list of nodes that should have rac instances running for the Admin Managed Cluster Database. LocalNode should  be the first node in this nodelist. -->

...

<!--Specify Database Area Location to be configured for rac database.If this field is left empty, current storage will be use d for rac database. For CFS, this field will have directory path. -->
 +DATA
4. Move the spfile to the shared location, in this case the Single Instance Database was hosted on file system, in this process we will move the datafiles from file system storage to ASM.
So create spfile in the shared disk location
SQL>create spfile='+DATA/TEST/spfiletest.ora' from pfile;
You can check if the file is created through “asmcmd”
5. Take a backup of existing $SOURCE_ORACLE_HOME/dbs/initTEST.ora, and create a new $SOURCE_ORACLE_HOME/dbs/initTEST.ora with the following parameter:
spfile='+DATA/TEST/spfiletest.ora'
6. Restart the Database
7. Now lets test if “rconfig” is ready for conversion, navigate to $ORACLE_HOME/bin and issue the following command
$./rconfig $ORACLE_HOME/assistants/rconfig/sampleXMLs/ConvertToRAC_AdminManaged.xml
The above command validates( as we’ve set convert=”ONLY”) if rconfig is ready for conversion. If the output throws any error, diagnose and troubleshoot to fix the issue. Refer to the following output for successful validation:
...

 Operation Succeeded

There is no return value for this step

..
8. Now are we are ready for conversion, edit the xml file “ConvertToRAC_AdminManaged.xml” and change:
from:
..
 <n:Convert verify="ONLY">
..
to
..
 <n:Convert verify="YES">
..
9. Perform the conversion
$./rconfig $ORACLE_HOME/assistants/rconfig/sampleXMLs/ConvertToRAC_AdminManaged.xml
The conversion will take some time to complete. The progress can be monitored from the logs located at $ORACLE_BASE/cfgtoollogs/rconfig
10. Once the conversion is complete you’d get a similar message in step 7.
11. Perform sanity checks and tweak the listener to suit your needs.
That sums up the procedure to convert Single Instance Oracle Database to RAC database. Please do share your thoughts and comments.
Reference:
http://download.oracle.com/docs/cd/E11882_01/install.112/e17214/cvrt2rac.htm#BABGGEGJ
Step by Step Oracle 10g R2 installation on Solaris 10
August 21, 2009
My Second blog…. 🙂
Thist post is about installation of Oracle 10g R2 on Solaris 10. If you wish to install Solaris 10 on VMware heres the link.
Having installed Oracle 10g and various other releases as a part of project implementations/upgrade on various environments thought it’d be a good idea to spread the knowledge :).
I have installed Oracle 10g R2 on the Solaris 10 VM I created last week(see my earliar post).
So.. Lets get started..
Software:
Database: Oracle Database 10g R2
Pre-Installation Tasks
1. Determine the physical RAM size:
# /usr/sbin/prtconf | grep "Memory size"

Memory size: 1024 Megabytes

#
2. To determine the size of the configured swap space, enter the following command:
# /usr/sbin/swap -s

total: 360448k bytes allocated + 72480k reserved = 432928k used, 1335996k available

#
3. Ensure /tmp has atleast 400MB, you can set different “temp” location by setting the environment variables “TMP” and “TMPDIR”
# df -k /tmp
4. Ensure there is enough disk space to install Oracle Software and Create starter database:
# df -h /ora10g
Filesystem             size   used  avail capacity  Mounted on
/dev/dsk/c1t1d0s6      7.9G   8.0M   7.8G     1%    /ora10g
#
5. Determine the System Architecture
# isainfo -kv
64-bit amd64 kernel modules
#
6. Check Software Requirements
# pkginfo -i SUNWarc SUNWbtool SUNWhea SUNWlibm SUNWlibms SUNWsprot \
 SUNWtoo SUNWi1of SUNWi1cs SUNWi15cs SUNWxwfnt
system      SUNWarc   Lint Libraries (usr)
system      SUNWbtool CCS tools bundled with SunOS
system      SUNWhea   SunOS Header Files
system      SUNWi15cs X11 ISO8859-15 Codeset Support
system      SUNWi1cs  X11 ISO8859-1 Codeset Support
system      SUNWi1of  ISO-8859-1 (Latin-1) Optional Fonts
system      SUNWlibm  Math & Microtasking Library Headers & Lint Files (Usr)
system      SUNWlibms Math & Microtasking Libraries (Usr)
system      SUNWsprot Solaris Bundled tools
system      SUNWtoo   Programming Tools
system      SUNWxwfnt X Window System platform required fonts
#
If you do not find any patches installed, use the following command to add the packages:
#pkgadd -d /cdrom/sol_10_1106_x86/Solaris_10/Product <Package Name>
7. Hostname / Domain Name Checks:
If you use DNS:
#cat /etc/nsswitch.conf | grep hosts
In this case I did not use DNS, so I’d do the following:
# hostname
orasun02
# domainname
XYZ.com
# cat /etc/hosts | grep `eval hostname`
192.168.1.106   orasun02.XYZ.com         orasun02        loghost
#
8. Creating Oracle User and Groups
- Create Oracle Inventory Group(oinstall)
# /usr/sbin/groupadd oinstall
- Create OSDBA group (dba)
# /usr/sbin/groupadd dba
- Create Project Group
# projadd group.dba
# projects -l group.dba
group.dba
 projid : 101
 comment: ""
 users  : (none)
 groups : (none)
 attribs:
#
- Add resources to project “group.dba”
#projmod -sK "project.max-shm-memory=(privileged,2G,deny)" group.dba
#projmod -sK "project.max-sem-ids=(privileged,100,deny)" group.dba
#projmod -sK "project.max-shm-ids=(privileged,100,deny)" group.dba
#projmod -sK "project.max-sem-nsems=(privileged,256,deny)" group.dba
- Create “oracle” user
#useradd -g oinstall -G dba -m -d /export/home/oracle -s /bin/ksh -K project=group.dba oracle
- Set the password of the oracle user:
# passwd -r files oracle
- Verify user “nobody” exists:
# id nobody
uid=60001(nobody) gid=60001(nobody)
#
9. Creating Directories
#mkdir -p /ora10g/oracle/
#chown -Rh oracle:oinstall /ora10g/oracle
#chmod -R 755 /ora10g/oracle
10. Login to user “oracle” and edit “.profile” to set ORACLE_BASE,ORACLE_HOME,etc
# Oracle Settings
TMP=/tmp; export TMP
TMPDIR=$TMP; export TMPDIR
ORACLE_BASE=/ora10g/oracle; export ORACLE_BASE
ORACLE_HOME=$ORACLE_BASE/product/10.2.0/db_1; export ORACLE_HOME
ORACLE_SID=ORCL; export ORACLE_SID
PATH=$ORACLE_HOME/bin:$PATH; export PATH
Installation
- Allow user “oracle” to use the display(Here I assume you’d be using Xterm like Xorg/XSun/vncserver/etc, so login as “root” and issue the following command:
#/usr/openwin/bin/xhost +
Ensure the display is working for user “oracle”
# su - oracle
$DISPLAY=orasun02:0.0
$export DISPLAY
$/usr/bin/xclock
$

- Unpack the Oracle 10g Software:
#unzip -o 10201_database_solx86_64.zip
- Invoke “runInstaller”
# ./runInstaller
- Select Installation Method, I have chosen “Advanced Installation” and click “Next”

- Select Installation Type, I have chosen “Enterprise Edition”, Click “Next” to proceed further
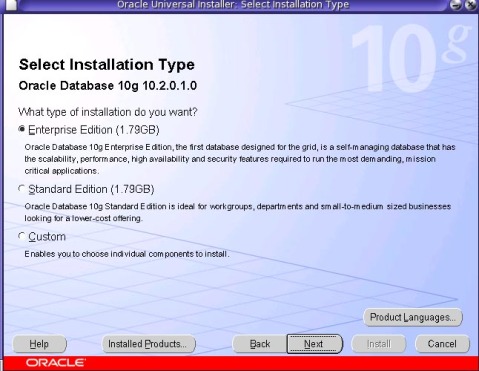
- Specify Oracle Home details, this is already picked up as we specified in .profile, confirm if its right , alternatively change as desired. Click “Next” to continue

- Now Oracle does Product Specific Pre-requisite Checks, if you see it failed with 2 warnings and if you notice we have not set the kernel parameters shown in the sceenshot. This is fine as in Solaris 10 the resources are managed through the resource control, as we have configured in step 8.

- Select Configuration Option, Choose radio button “Create Database” and click “Next”

- Select Database Configuration , choose “General Purpose Database” and click “Next”

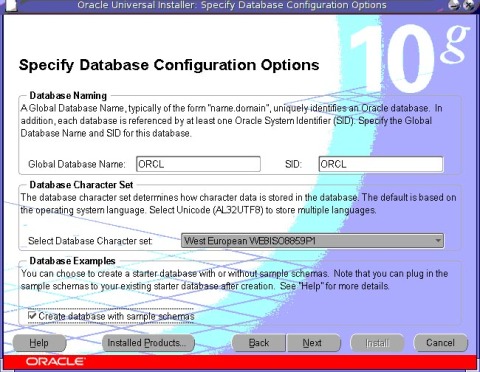
- Specify Database Configuration Options, the screen look similar to as below screenshot, and click “Next”
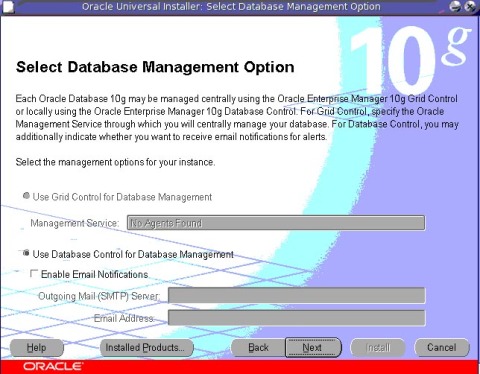
- Select Database Management Option, click “Next”
- Specify database storage option, should like the screenshot below, click “Next” to continue

- I have chosen not to enable automated backups, Click “Next”

- Specify Database Schema Passwords and click “Next”

- Finally.. click “Install” to start the installation.
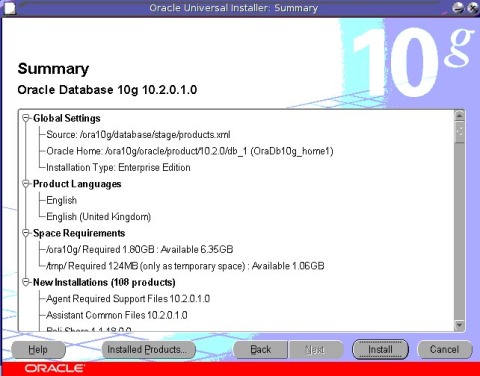
- After the installation finishes and starter database is created, Execute the configuration scripts, show in the below screenshot
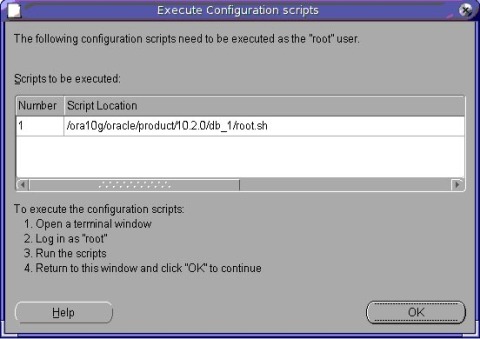
From the terminal execute the “root.sh” as user “root”:
# /ora10g/oracle/product/10.2.0/db_1/root.sh
Running Oracle10 root.sh script...

The following environment variables are set as:
    ORACLE_OWNER= oracle
    ORACLE_HOME=  /ora10g/oracle/product/10.2.0/db_1

Enter the full pathname of the local bin directory: [/usr/local/bin]:
   Copying dbhome to /usr/local/bin ...
   Copying oraenv to /usr/local/bin ...
   Copying coraenv to /usr/local/bin ...

Entries will be added to the /var/opt/oracle/oratab file as needed by
Database Configuration Assistant when a database is created
Finished running generic part of root.sh script.
Now product-specific root actions will be performed.
#
Then go back to Oracle Universal Installer screen and click “OK”
- Thats it , its the end of installation and your database should be up and running.

- Lets login to the Oracle Enterprise Manager 10g


