Step by Step Installation and Configuration of WebLogic Server!
July 23, 2010
This week I was working on a project to implement Single Sign On with EBS R12, as a first pre-requisite I had to install and configure WebLogic Server.
Here are the steps to install and perform a basic configuration for WebLogic Server.
Software
1. Download Weblogic Server from the following URL:
http://www.oracle.com/technology/software/products/middleware/htdocs/fmw_11_download.html
2. Review documentation to meet the basic hardware and software requirements:
http://download.oracle.com/docs/cd/E15523_01/doc.1111/e14142/toc.htm
Installation
1. I’ve created an operating user “oracle” to own the WebLogic Server, so as a “root” Super User do the following:
#groupadd dba
#useradd -g dba oracle
#mkdir -p /u01/oracle/middleware
#chown -Rh oracle:dba /u01/oracle/middleware
#xhost +
2. Now login as “oracle” and invoke the installer (I’ve downloaded the installer at /u01/dumps) as seen below. Click “Next”
3. Enter the location for Middle Ware Home and click “Next”
4. Register for Security Updates if you wish to and click “Next”
5. Choose Install Type, I’ve chosen “Custom” and click “Next”
6. Choose “Products and Components” you wish to use and click “Next”
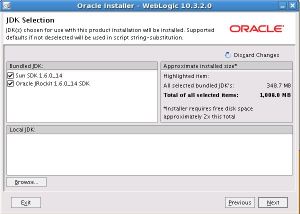
7. If you have previous JDK/JRockit SDK, you can choose to browse the path, although Oracle recommends that you download the latest JRockit SDK to use with WebLogic. You can download the latest JRockit from:
http://www.oracle.com/technology/products/jrockit/index.html
8. Choose “Product Installation Directories” and click “Next”
9. Review the Installation Summary and click “Next”
10. Once the installation completes, the “Run QuickStart” is checked. We’ll launch the QuickStart by clicking “Done”
11. Once clicked “Done”, You will be presented with the following which lets you choose 3 Options, We’ll go ahead with the 1st to proceed with the configuration wizard.
Configuration
12. Now in the configuration wizard, we’ll choose “Create New WebLogic Domain” and click “Next”
13. Choose the defaults, I’ve also chosen “WebLogic Advanced Web Services Extension” from the following screen, click “Next” to proceed
14. Now enter the Domain Name and Enter the Domain Location, click “Next” to proceed:
15. Configure the WebLogic Administrator and Password, click “Next” to proceed.
16. As this is a basic install and for development purposes, I will choose the “Domain Startup Mode” as “Development. Careful consideration should be taken for production deployment. Click “Next” to proceed
17. Select the Optional Configuration , I’ve selected the following options(we can configure JMS at a later stage):
18. Configure the Admin Server:
19. Configure the Managed servers and click “Next”
20. Next screen asks you if you wish to configure cluster, I did not configure any cluster. Click “Next” to proceed.
21. Next Screen is Configure Machines, I’ve not configured any. Click ” Next” to proceed
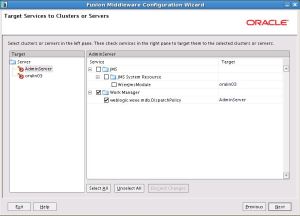
22. Configure Target Services to Clusters or Servers, review and click “Next” to proceed
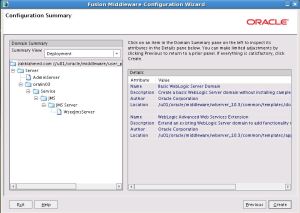
23. Review the Configuration Summary and click “Create”
24. Click “Done” to finish and close the quickstart screen.
Now that we have installed and configured the WebLogic server, lets start the WebLogic server for the domain we configured. The startup scripts are placed in the user_projects directory for the domain we configured.
25. Start the WebLogic Server
[oracle@oralin03 zakkiahmed.com]$ cd
[oracle@oralin03 ~]$ cd /u01/oracle/middleware/user_projects/domains/zakkiahmed.com
[oracle@oralin03 zakkiahmed.com]$ ls
autodeploy            init-info                        startWebLogic.sh
bin                   lib                              WseeFileStore
config                security                         WseeFileStoreAdminServer
console-ext           servers
fileRealm.properties  startManagedWebLogic_readme.txt
[oracle@oralin03 zakkiahmed.com]$./startWebLogic.sh
Now that the WebLogic Server is started lets login to the console
26. In to order login to the console open the web browser , the URL will be of the following format:
http://<hostname>.<domain name>:7001/console
In my case it will be
http://oralin03.zakkiahmed.com:7001/console
You will be presented with the following screen:
The user name is “weblogic” and the password is what you configured during the configuration.
27. You will be presented with a neat front page, navigate to check the state of services on the left panel, follow the screenshot:
Thats it folks, the installation and basic configuration of WebLogic Server is complete. Feel free to comment and share your thoughts.
Thanks for reading.
Filed in Application Servers, Linux, Operating System, Oracle, WebLogic
Tags: bea, bea weblogic, Fusion Middleware, Oracle, Oracle Fusion, WebLogic


July 24, 2010 at 8:29 pm
Good one Zakki ..
-Rupesh
August 19, 2010 at 10:06 pm
Hi Zakki,
I installed Weblogic, but i don’t see Teradata in the drop down list of databases. Is there any workaround to connect teradata database.
Thanks
Aj
August 19, 2010 at 11:54 pm
Hi Ajit,
Follow this guide, you have to choose “other” as your database type from JDBC pools
http://www.teradata.com/DownloadCenter/Topic9448-98-1.aspx#stdsp10.3
Regards,
Zakki
August 27, 2010 at 6:34 am
Dear Zakki Ahmed,
Thank you so much for your article can you give me some time and have conversation on telephonic conversation about weblogic clustering environment.
Thanks
Adeel
03014477817
August 31, 2010 at 6:51 pm
Zakki
I am having the most difficult time with WebLogic installation. I’ve downloaded and unzipped the Oracle WebLogic Server 11g Rel 1 (10.3.3) Installer folder into my file system. That is: /Application/wls1033_dev. I am running a Mac by the way. Inside the folder are 3 other folders: modules folder, utils folder, and the wlsever folder along with configure.cmd, configure.sh, configure.xml, README.txt, registry.template plain files. i tried follow the README.txt instructions by running configure.sh file. But it opens up my NetBeans IDE as I do. Does not make sense.
WHERE DO I GO FROM HERE? i have spent countless hours looking for help and can’t seem to find anything that will take me from what I have stated above and step me through. I finally came across your fine article “Step by Step Installation and Configuration of WebLogic Server” Here too, the irony is, I can’t seem to figure how I get pass step 1 in your tutorial. Please help me.
I will be very grateful if you can help me to understand, in clear, non-technical terms how I go from me having the WLServer on my file system to step no. 1 of your narrative. If you can notify via email of your comments, I’ll appreciate it. Thanx in advance.
Sal
September 3, 2010 at 4:52 pm
Zakki
I really need help so please see if you can help me. Somebody please help me with my query dated Aug 31, 2010. Thanx
Sal
March 10, 2011 at 3:35 am
What kind of Single Sign On are you using? Is this SiteMinder?
March 10, 2011 at 2:43 pm
Marwooj,
I dint get your question, do you mean what single sign on solutions are available with weblogic?
Regards,
Zakki
March 10, 2011 at 4:16 pm
No, I am asking if you are using SiteMinder
March 10, 2011 at 4:19 pm
No, never used it before
June 8, 2011 at 8:29 am
Thanks Zakki, you made it so simple…. thanks again! – Ajith Kumara
September 28, 2011 at 7:56 am
Great and clean post. thanks
October 13, 2011 at 10:38 am
Thanks.
This worked perfectly….
Eric
September 6, 2012 at 8:34 am
Quick and easy to get through.. Thanks for the post. Just that I was unable to login to Administration Console using the password which was used for configuration earlier. Later, was able to login through username: weblogic and password: welcome1.
December 11, 2012 at 4:32 pm
good, pls provide the performance tuning concepts with weblogic.
Regards,
Rahamthulla
January 17, 2013 at 6:03 am
Excellent installation guide for persons who are new to WebLogic Server. Thank you Zakki
January 17, 2013 at 12:22 pm
Nice article.. worked perfectly
Aparna
April 19, 2013 at 9:38 pm
Thanks Zakki, very good installation guide.